 | Emos United Forums
welcome to the Emos United forums
|
| | | Basic Mapping Tutorial |  |
| | | Author | Message |
|---|
MildlyInsane
Admin

Number of posts : 16
Age : 32
Location : Everywhere
Clan : Emos United
Registration date : 2007-08-25
|  Subject: Basic Mapping Tutorial Subject: Basic Mapping Tutorial  Mon Aug 27, 2007 10:24 am Mon Aug 27, 2007 10:24 am | |
| MildlyInsane's Mapping Tutorial So you want to learn how to make a map? Well, that's what this thread is for! I will teach you all the basics of mapping in Valve hammer editor. So... what are we waiting for? let's begin! WHAT YOU NEED: A computer Source SDK An Imagination WHAT IS SOURCE SDK AND WHERE DO I GET IT? Source SDK is a tool that contains some modding programs, including valve hammer editor. To get Source SDK, just go into tools in steam.  Then, launch source SDK. You will need to install it first, though. This may take a wile, but be patient. it is worth it!  Contents:  Post one - intro & where to get SDK [you are here] Post two - the tools in hammer Post three - Your first room Post four - Placing spawns and lights Post five - Playing your map Post six - Building extensions Post seven - Textures Post eight - Clipping Post nine - Buyzones and Bombsites
Last edited by on Tue Aug 28, 2007 6:42 pm; edited 8 times in total | |
| | | | MildlyInsane
Admin
Number of posts : 16
Age : 32
Location : Everywhere
Clan : Emos United
Registration date : 2007-08-25
| | Subject: Re: Basic Mapping Tutorial Mon Aug 27, 2007 11:07 am | |
| THE TOOLS IN HAMMER Now, before i tell you about the tools, we need to open hammer. Launch SDK, and when this appears:  Double click on hammer editor at the top, but make sure 'current game' is set to counter-strike: source, and say hello to the hammer editor! Ok, first things first, select 'new' in file, and you should see something like this:  The black square in the top left is the 3D view, and the other 3squares with grid lines are the 2d views. On the left hand side are the tools used for making maps.  SELECT: At the top is the select tool. This is the tool you use to select blocks, entities, etc. If you don't know what blocks/entities are, don't worry. well will get onto that soon. ZOOM: Next, is the zoom tool. Pretty self-explanatory, that one... moving on.... CAMERA: The camera tool lets you place the 3D camera anywhere in your map. ENTITY: This tool lets you place entities which aren't block-based, like spawn points and weapons. We will get onto this in more detail later. BLOCK: This tool lets you place blocks in your map. The blocks you can vary in shape. TEXTURE: This tool lets you apply textures to blocks, to make everything look good. APPLY TEXTURE: This tool applies the current texture to the selected block on all its sides. DECALS: This lets you apply decals to the map, for example graffiti. APPLY OVERLAYS: I have never used this tool, so i don't know what it does. CLIPPING TOOL: This tool allows you to cut away at blocks, to make different shaped floors etc. VERTEX: The bottom tool is the vertex tool. It allows you to drag the corners of a block to make it differently shaped. This is how surfs are made. | |
| | | | MildlyInsane
Admin
Number of posts : 16
Age : 32
Location : Everywhere
Clan : Emos United
Registration date : 2007-08-25
| | Subject: Re: Basic Mapping Tutorial Mon Aug 27, 2007 11:46 am | |
| YOUR FIRST ROOM Ok, so mow that i have explained the tools a little, lets get mapping! Firstly, select the BLOCK TOOL. (the top one that looks like a cube) Now, in the TOP RIGHT SQUARE (one of the ones with grid lines) click and drag a square shape. The numbers you see on the edges are UNITS. Units are how blocks are measured. Make your square 260 X 260 UNITS. Now, in the BOTTOM LEFT OR RIGHT SQUARE (it doesn't matter which, as both are the side view) drag the small white square down, so the block will be 320 UNITS HIGH. It should look something like this:  Now, press enter. The dashed-outlineline should now be a solid outlineline. If it just disappears, make sure you had the BLOCK TOOL selected, and not the SELECT TOOL. You have just created your first block! But it is useless, unless you can get inside, so lets sort that out now! Now, choose the SELECT TOOL. The solid outline should now be red and yellow. If it isn't, just click on the square. Now press CONTROL-H. You should see this pop-up:  As you can see, it is asking how thick the walls should be, and to hollow outwards the number should be a minus. I think it is best as -32, so put a minus before the 32, and hit enter. You have now made your first room! That wasn't too hard, was it? You may or may not have noticed in the 3D VIEW (the top left square) that something appeared. That is your new room! In the top left of 3D VIEW, click the word 'camera' and select '3D TEXTURED' in the drop-down menu. Now, with your mouse over the 3D VIEW, press 'Z' and you should see a cross appear in the middle of 3D VIEW. You are now in control of the camera. move your mouse to look around, and press W to move forwards, S to move backwards, A to move left and D to move right. | |
| | | | MildlyInsane
Admin
Number of posts : 16
Age : 32
Location : Everywhere
Clan : Emos United
Registration date : 2007-08-25
| | Subject: Re: Basic Mapping Tutorial Mon Aug 27, 2007 12:46 pm | |
| PLACING SPAWNS AND LIGHTS Your room is still useless without a single spawn-point, so lets place one now! Select the ENTITY TOOL. (the on shaped like a light bulb) On the right, you should see this:  This is where you select ENTITIES. ENTITIES can range from things like weapons, lasers, lights, fire, and the one that we want: Spawn points. If it is not already selected, choose info_player_terrorist from the menu. This is the name of the terrorist spawn location. Use the ZOOM TOOL (the one that looks like a magnifying glass) and zoom into your first room (left click to zoom IN. You can also use your MOUSE WHEEL to zoom) C lick where i have here, in the TOP LEFT square:  (it is indicated by where the green lines cross-over) You should see these lines appear on your map, too. Make sure the center of them is ONE BOX OFF THE GROUND on the bottom views (see this screen shot if you unsure of what this means)  Now press enter, and the spawn point will be created! (you should see it as a terrorist in 3D VIEW now.) You create LIGHTS in the same way, but with an extra, optional, step at the end. Under the ENTITIES MENU, select 'light' and place it the same way as you did the spawn point, but this time place it near the ceiling, for obvious reasons! Ah... we have a problem.... We cant get the light close enough to the ceiling... Well, here is how we sort this out: Look at this, at the bottom of the screen:  This meant that each square made by the grid is 64 UNITS X 64 UNITS. Thats our problem! All wee need to do is reduce this number. To do this, press this button: [ The squares should get smaller. Press the button once more. The squares are now 16 X 16 UNITS. Place the light one square away from the ceiling, the same way as the spawn point. You should see a square appear with the word 'light' above it. Now for the extra, optional, step. Use the select to select the light entity. Now right click the entity and select 'properties' at the bottom of the menu. You should see this appear:  All we are interested in is the bit that says 'brightness', so Click it. This gets a LITTLE bit complicated, but nothing to worry about. The first 3 numbers should all be 255, by default. These three numbers set the COLOUR of the light. The 4th number is the BRIGHTNESS of the light.  You can play around with these values now, but I'm going to leave them as they are. | |
| | | | MildlyInsane
Admin
Number of posts : 16
Age : 32
Location : Everywhere
Clan : Emos United
Registration date : 2007-08-25
| | Subject: Re: Basic Mapping Tutorial Mon Aug 27, 2007 1:04 pm | |
| PLAYING YOUR MAP You can almost play your map now! All you have to do is save & compile you map. First press CONTROL+S to save your map. You can call it whatever you want. Why should you ALWAYS save it before compiling? Well, compiling is when your map is put into the game, and it can sometime take a long time. Possibly hours. You would hate your computer to crash right now, while its compiling, right? Now then, to compile the map, press f9. You should see this:  Make sure all the options are set as they are in this screen shot, and press OK. You will see a window like this appear now:  This is the compile progress window. When the words 'Copy To Clipboard' Appear at the bottom of the window, exit the compile progress window and close hammer and SDK. Now, open up CS:S and click 'create new server' and look for your map in the list. It should be listed with the name you gave it when you saved. Now you can play it, and run around your little box for a bit. That is the VERY BASICS of mapping. Next, we will be going onto slightly more complex stuff. | |
| | | | MildlyInsane
Admin
Number of posts : 16
Age : 32
Location : Everywhere
Clan : Emos United
Registration date : 2007-08-25
| | Subject: Re: Basic Mapping Tutorial Mon Aug 27, 2007 5:57 pm | |
| BUILDING EXTENSIONS Next we are going to extend the map. OK, first thing to do is to make sure your first room is SELECTED. Next, press CONTROL+U. This will UN-GROUP your room. Now select one of the walls. (top-right view)  Now press delete to remove the wall. If you have to, make the floor and ceiling in line with the walls. Now add another BLOCK, about 356 X 1024 UNITS. It should also be 320 UNITS high.  Press enter again to create the block. Hollow the new block using CONTROL-H, and again put -32. Set the size of the grid to 32 and place the two blocks right next to each other. UN-GROUP the new block. Select the wall next to the first room and drag the white box to make a gap into the next block. fix any gaps in the same way. That is the new extension finished! It should look like this in 3D view:  | |
| | | | MildlyInsane
Admin
Number of posts : 16
Age : 32
Location : Everywhere
Clan : Emos United
Registration date : 2007-08-25
| | Subject: Re: Basic Mapping Tutorial Tue Aug 28, 2007 5:03 am | |
| TEXTURES OK, adding texture is quick, and easy, so lets get started. Right now, the map looks... well, it looks ugly! So lets add new TEXTURES on the walls, ceiling and floor. Firstly, we will add a TEXTURE to the floor. Click on the TEXTURES TOOL (the one that looks like a green, blue and red cube) and this should pop-up:  Click 'Browse' net to the image of the current texture, and this will pop-up:  This is where you choose the texture you want to use. Firstly, make sure that 'size' in the bottom left is set to 128X128, so you can see more textures. As we are looking for a texture for the floor, type 'floor' in the filter section. It now shows you all the textures with floor in their name. Look for this texture:  And double click it. You will go back to the first pop-up you saw. Notice that the picture next to the browse button has now changed. That means that you have changed the selected texture. Now with this pop-up still open, you can still control the 3D camera, so control it as i told you how to before. With the pop-up still open, right click the floor of both the blocks you made. Now click browse again, and type ceiling in the filter bit. Now choose this texture:  Apply this texture to the ceiling in the same way as you did for the floor. Finally, we will texture the walls, so go back into the the texture browser, and type 'wall' in the filter. There are lots of textures here, so type 'brick' next to the word 'wall' to show less textures. Choose this texture:  And apply it to all the walls. The map should now look like this:  You can now save and compile again to see what it look like if you want. | |
| | | | MildlyInsane
Admin
Number of posts : 16
Age : 32
Location : Everywhere
Clan : Emos United
Registration date : 2007-08-25
| | Subject: Re: Basic Mapping Tutorial Tue Aug 28, 2007 6:33 am | |
| CLIPPING Next i will explain how the CLIPPING TOOL works. The clipping tool is the tool second to last. (the one that looks like a slope) Firstly, we need something to clip. remember when you dragged the wall back to connect your two rooms? drag it back so they are closed of again.  Notice that the wall is still untextured. That is because we didn't texture the outside walls. You can either leave it as it is or texture it to match the other walls. Now, with that wall selected, select the CLIPPING TOOL. In the view that looks like this:  The yellow, green and blue lines show where we are going to cut a hole in the wall. (Grid size: 32) So with the wall selected and the CLIPPING TOOL selected, click and drag a line on the map where the yellow line is. You may notice that one side of the wall is a red line, and the other is white, separated by the CLIPPING LINE. If this is the case, press CONTROL+X until both sides are white. It should look like this:  When both sides of the wall are white, press enter. Do the same for the green and blue lines now. With that step done, select the rectangle you just carved out of the wall...  ...And press delete. Done! 
Last edited by on Tue Aug 28, 2007 7:11 am; edited 1 time in total | |
| | | | MildlyInsane
Admin
Number of posts : 16
Age : 32
Location : Everywhere
Clan : Emos United
Registration date : 2007-08-25
| | Subject: Re: Basic Mapping Tutorial Tue Aug 28, 2007 6:34 am | |
| BOMBSITES & BUYZONES OK, last part of the tutorial. I'm going to teach you how to create bombsites and buyzones. Both of these are BLOCK-BASED ENTITIES, that basically means that they are created using blocks. Firstly, select the BLOCK TOOL, and drag out a block that fills the whole of of the first block you made.  With it selected, press CONTROL+T to bring up the block-based entity pop-up. 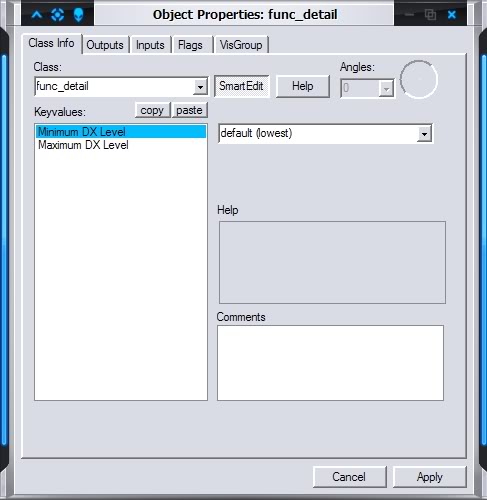 In the drop-down menu, select func_buyzone. Select Team Number (int) and under the drop-down menu on the right, select Terrorist, click apply and finally click cancel to close the pop-up. Thats the buyzone finished. Now, we will make the bombsite. Firstly, select the block tool again. this time, make the block at the end of the second block you made.  And with it selected, press CONTROL-T again. This time in the drop-down menu, select func_bomb_target. This time there are no variables to change, so just click apply and cancel. Save, Compile, DONE! | |
| | | | Sponsored content
| | Subject: Re: Basic Mapping Tutorial | |
| |
| | | | | | Basic Mapping Tutorial | |
|
| | Permissions in this forum: | You cannot reply to topics in this forum
| |
| |
| |
|